Mice problem action box
Need mice gone fast? Choose DIY control or professional help before activity spreads.
DIY trapping can work for light activity, but recurring droppings, attic noises, wall sounds, insulation contamination, or mice returning after sealing may require a professional inspection. Use the checklist below to act quickly and safely.
Disclosure: Some product links may be affiliate links. If you buy through them, we may earn a commission at no extra cost to you. For heavy contamination, illness risk, or unsafe areas, contact a qualified professional.
Mice Gone Guide
How to Clean Up Mouse Droppings Safely: Do Not Vacuum First
Helpful video: practical mouse-control steps
Watch this for a visual overview, then follow the written steps on this page for cleanup, proofing, bait placement, and safety details.
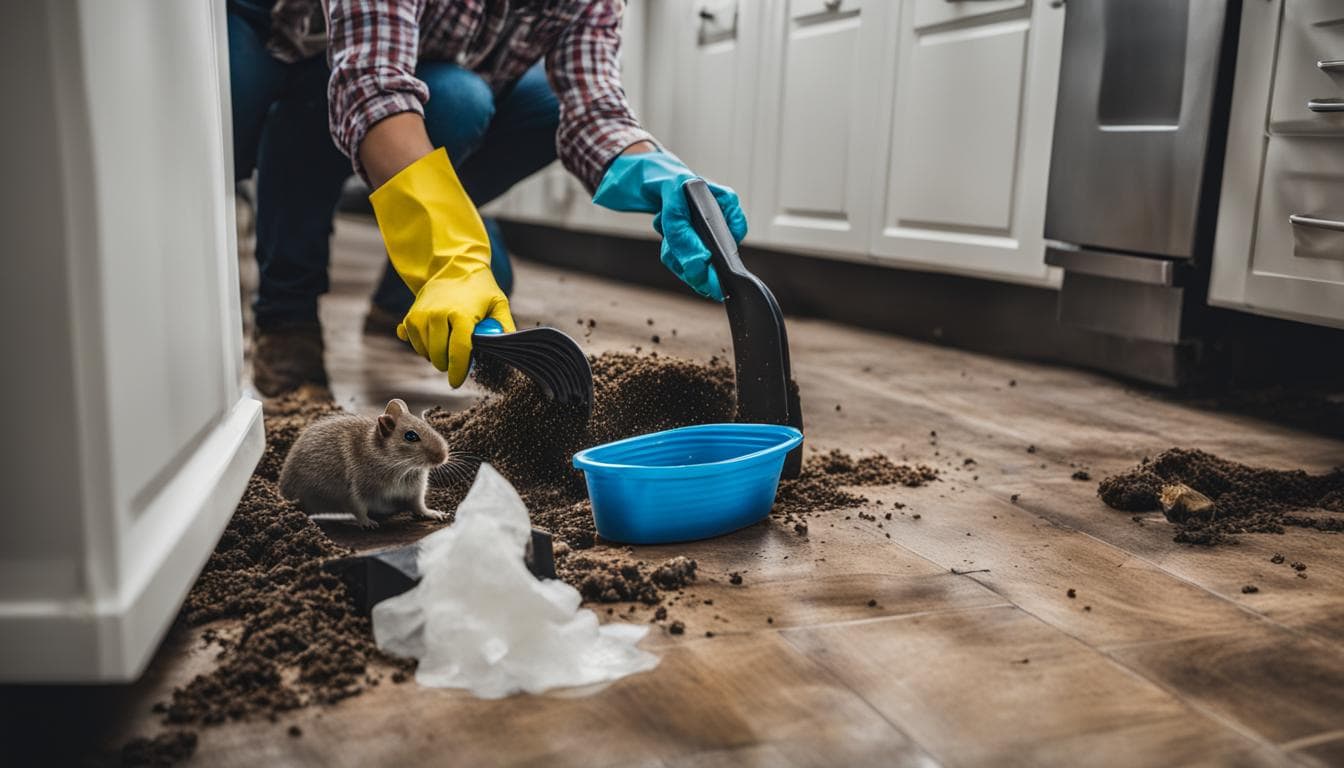

Why dry cleanup is the wrong first move
Mouse droppings, mouse urine, dead rodents, and nesting material can become a dust problem when disturbed. The fastest unsafe mistake is to grab a broom, shop vacuum, household vacuum, leaf blower, or compressed air. That action can move particles into the air and spread contamination beyond the original area. Safe cleanup starts by keeping the material wet and contained.
The goal is not to sterilize your entire home with panic. The goal is to avoid creating contaminated dust, clean the visible material safely, and then remove the reason mice were there. If the source remains open, new droppings can appear after the cleanup.
The safe cleanup sequence
- Document the evidence. Take a photo before cleanup so you know where activity was strongest.
- Clear the area. Keep children, pets, and unnecessary people out of the cleanup zone.
- Ventilate. Open doors and windows where practical and safe.
- Wear gloves. Use rubber, plastic, or disposable gloves before touching materials.
- Wet completely. Spray droppings, urine marks, nests, and the surrounding hard surface with disinfectant until wet.
- Wait. Follow the product label contact time. Do not rush this step.
- Wipe, do not sweep. Use disposable towels to remove material.
- Bag waste. Place towels and waste in a bag, seal it, and put it into a covered trash container.
- Disinfect again. Mop or wipe hard surfaces after visible waste is removed.
- Wash up. Wash gloved hands before removing gloves when possible, then wash bare hands after removing gloves.
How to clean mouse droppings in cabinets and drawers
Cabinets and drawers are common because pipes, cabinet backs, and baseboard gaps create hidden routes. Remove dishes, utensils, liners, food packages, and loose items before cleaning. Throw away food that was open, chewed, or possibly contaminated. Wet droppings and surfaces, wipe with disposable towels, disinfect hard surfaces, dry fully, and replace paper liners only after the area is clean and monitored.
Do not ignore the route. Look under the sink, around pipe penetrations, behind the toe kick, and along the cabinet-wall seam. Link this cleanup to mouse proofing or the same cabinet can become contaminated again.
How to clean dried mouse droppings
Dried mouse droppings are still handled with the same wet method. Do not crush them to check age. Do not sweep them just because they look old. Spray until the droppings and surrounding dust are wet, wait, wipe, and dispose. After cleanup, monitor the area for new droppings to decide whether the activity is old or active.
How to clean mouse droppings in a garage
Garages are often dusty, cluttered, and full of seed, pet food, cardboard, tools, and vehicle hiding places. Start by opening the garage door for ventilation while keeping children and pets away. Move boxes carefully. Avoid dragging contaminated cardboard through the house. Wet droppings before wiping, discard contaminated porous materials when needed, and move food attractants into rigid sealed containers.
Use the garage mouse-control guide after cleanup so you can fix door-corner gaps, wall-floor cracks, and storage conditions.
How to clean mouse droppings on carpet, rugs, or upholstery
Soft surfaces are harder than shelves and floors because contamination can settle into fibers. Do not brush, beat, or vacuum dry debris. Wet the visible material first, remove it carefully, then clean the textile with a method appropriate for that surface. Washable bedding or clothing should be laundered with detergent and dried thoroughly. For rugs, upholstery, heavy odor, or large contamination, professional cleaning or disposal may be the safer choice.
How to clean after finding a dead mouse or nest
Put on gloves. Spray the dead mouse, nest, trap, and surrounding area with disinfectant and wait for the required contact time. Place the rodent, nesting material, and disposable cleanup materials in a bag. Seal that bag, then place it inside a second bag before disposal. If you plan to reuse a snap trap, disinfect the trap first and follow the manufacturer instructions. Never handle dead rodents with bare hands.
Cleanup supplies after the safety sequence is clear
Affiliate disclosure: as an Amazon Associate, Mice Gone Guide may earn from qualifying purchases. Product availability, packaging, sellers, and labels can change. Check the current listing and product label before buying or using anything around children, pets, food, or contaminated areas.

Heavy-Duty Nitrile Disposable Gloves
Best for: Reducing direct hand contact while wiping droppings, bagging disposable towels, and handling contaminated liners.
Avoid if: Do not reuse disposable gloves after cleanup or touch clean surfaces with contaminated gloves.

N95 Respirator for Dust-Control Preparation
Best for: Extra caution when preparing a dusty area before wet cleanup, especially in garages, sheds, and storage spaces.
Avoid if: Do not treat a respirator as permission to disturb heavy contamination, insulation, or HVAC areas yourself.

Xcluder Rodent Control Fill Fabric DIY Kit
Best for: Packing small utility gaps, pipe penetrations, and siding transitions before sealing with the right surface-compatible material.
Avoid if: Do not use it as a structural repair for large holes, damaged masonry, open vents, or unsafe ladder work.
After cleanup, solve the active mouse problem
A clean surface is not proof that the infestation is gone. After cleanup, confirm whether signs are new or old, remove food access, place traps on active routes, seal entry points, and monitor. Use the mouse droppings identification guide to understand what you found, then use the removal guide to stop active mice and the proofing guide to keep replacements out.
Real-home examples for mouse droppings cleanup
The fastest way to solve a mouse problem is to stop treating the entire house as one vague infestation. Start with the room or surface where the evidence appears, then decide whether the priority is identification, cleanup, trapping, sealing, or prevention. The same evidence can mean different things in a kitchen, garage, wall void, apartment, or storage area.
Kitchen counter or food prep area
Pantry shelves
Garage storage
HVAC or duct area
Use this table before buying anything. A trap helps only when there is active mouse travel. A disinfectant helps only after contaminated material is wetted and wiped safely. Sealing material helps only when the gap is correctly identified and the repair does not block required ventilation, drainage, combustion air, or access for utilities.
Final checklist before you act
- Keep children, pets, and unnecessary people away from contaminated or trapped areas.
- Photograph droppings, gnaw marks, nests, rub marks, food damage, or possible entry holes before cleaning or sealing.
- Remove food access first: pet food, bird seed, pantry spills, trash, snacks, and cardboard clutter.
- Place traps only on confirmed active routes and only where they can be used safely.
- Wet droppings and nesting material with disinfectant before wiping or disposal.
- Seal gaps with durable, chew-resistant materials after active routes are controlled.
- Monitor the same spots for new droppings for at least two quiet weeks.
The core principle for mouse droppings cleanup is simple: identify the strongest evidence, choose the safest next step, close the cause of the problem, and monitor for new activity. That sequence is more useful than a miracle claim and safer than relying on a single product.
Frequently asked questions
How do I clean up mouse droppings safely?
Wear gloves, wet the droppings and nearby surfaces with disinfectant, wait for the required contact time, wipe with disposable towels, bag waste, disinfect again, and wash hands after removing gloves.
Can I vacuum mouse droppings with a HEPA vacuum?
Do not start by vacuuming dry droppings, even with a HEPA vacuum. First wet the contamination with disinfectant and wipe it up safely. Heavy contamination may require professional cleanup.
What disinfectant should I use for mouse droppings?
Use an EPA-registered disinfectant according to the label or a fresh bleach solution on compatible surfaces. Never mix bleach with ammonia or other cleaners.
How do I clean mouse droppings from carpet?
Do not brush or vacuum dry droppings. Wet the area carefully, remove visible material, then shampoo or steam clean according to surface safety. Heavy odor or saturation may require professional cleaning or disposal.
When should I call a professional for mouse droppings cleanup?
Call a professional for heavy contamination, insulation, HVAC areas, dead-rodent odor, inaccessible spaces, widespread droppings, or homes with high-risk occupants.
More practical questions readers ask
What should I do tonight if I cannot finish the whole job?
Do the safest reversible actions first. Move exposed food into rigid containers, keep children and pets away from contaminated areas, photograph evidence, place traps only where they can be used safely, and avoid dry cleanup. Do not start demolition, roof work, wall cutting, heavy contamination cleanup, or rodenticide use when you are tired or unsure.
What should I track after taking action?
Track the date, room, evidence type, cleanup completed, traps placed, catches, sealed gaps, and new signs. Simple notes prevent repeated guessing. If new droppings appear after cleanup, the route is still active. If traps are untouched but food damage continues, placement may be wrong or competing food remains.
What should happen after this step?
Every mouse problem has connected parts: signs, active removal, safe cleanup, exclusion, prevention, and monitoring. After the immediate problem is handled, check the related step that closes the loop. Droppings need cleanup and active control. Traps need food control and placement. Sealing needs monitoring. Prevention needs monthly checks.
What should I avoid believing?
Avoid guaranteed timelines, miracle repellents, fake testing claims, and one-product solutions. Mice are controlled by reducing access to food and shelter, trapping or otherwise controlling active animals, cleaning contamination safely, sealing entries, and verifying that new signs stop.
When should I stop DIY and call a professional?
Call a qualified professional for repeated activity after correct DIY steps, heavy droppings, contaminated insulation, HVAC contamination, inaccessible wall or attic activity, dead-rodent odor, wiring damage, or health-risk occupants. Professional help is also appropriate when you cannot place traps, clean waste, or seal gaps safely.
Sources and safety references
- CDC: How to Clean Up After Rodents
- CDC: Hantavirus Prevention
- UC IPM: House Mouse Pest Notes
- EPA: Controlling Rodents and Regulating Rodenticides
This page is educational information for ordinary homes. It is not medical, legal, pesticide-label, or professional remediation advice. Follow product labels, local rules, and professional guidance for high-risk conditions.

Alexios Papaioannou is the founder and lead editor of Mice Gone Guide. He oversees research, article review, and content updates focused on mouse prevention, humane control, home proofing, and safety-first household guidance.